Monday, November 26, 2012

Sometimes Being Wrong is a Good Thing

In my last rant I went on and on about crank case pressure and thought that I had hurt my motor. I took a deeper look into my problems and investigated further.

I have a five old daughter named Zoey. She likes to work on cars and she loves my Honda. During my last post I reported my dipstick hanging out as if crank case pressure pushed it out. Come to find out while I was investigating the oil under my car Zoey decided to check my oil for oil me. When she put back the dipstick, she didn't push it down far enough. She is so cute for trying to help! I was reading her a story a few nights ago and she told me what she had done.

Relief number one: crank case pressure did not push out my dip stick.

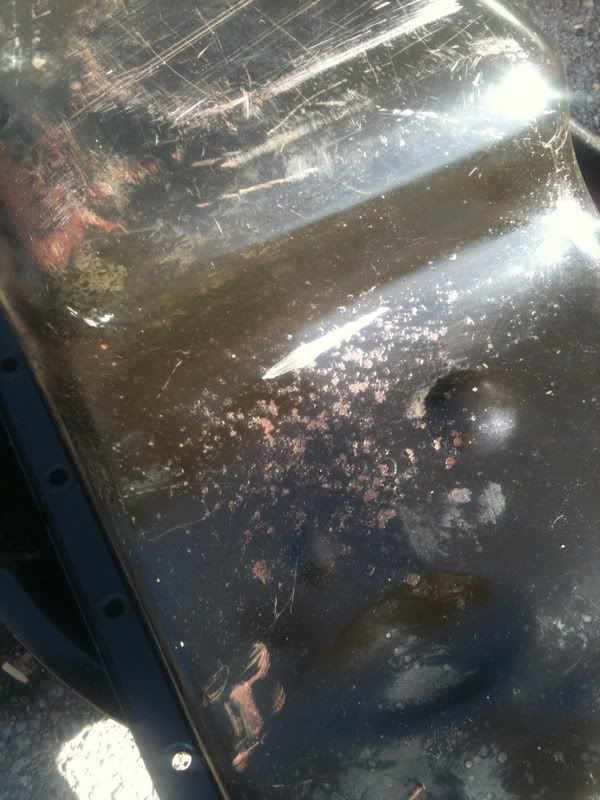
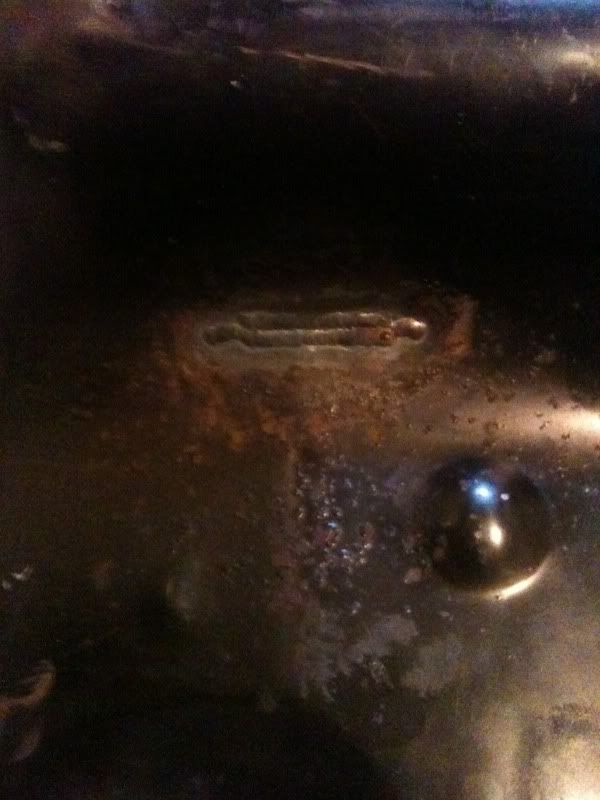
Days ago I had poured in Brad Penn oil. About 15 minutes after this I noticed oil started to leak. It almost looked as if the header itself was leaking! Clearly something cracked and I prayed that the oil was not coming out of my header. I removed my header and bam- the oil pan was cracked...


I had the brace on the megaphone too loose. Somehow the seam on the megaphone rubbed that hole in from the lack of tension on the megaphone.

Relief number two: oil didn't leak out because of crank case pressure. Yay!

When it rains, it pours. My Jeep's thermostat housing started to leak coolant. Two bolts hold on the thermostat cover. The first bolt came out okay, but the second bolt snapped. I tried and tried, but I could not get the bolt to come out. Both of my vehicles were down.

My wife and I found a local welder, Wagner Prop Shop that was only a few miles away. We walked over to their shop with my oil pan. The staff there was awesome! Not only did they weld my oil pan right away they only charged my $15 bucks. Here's the results...


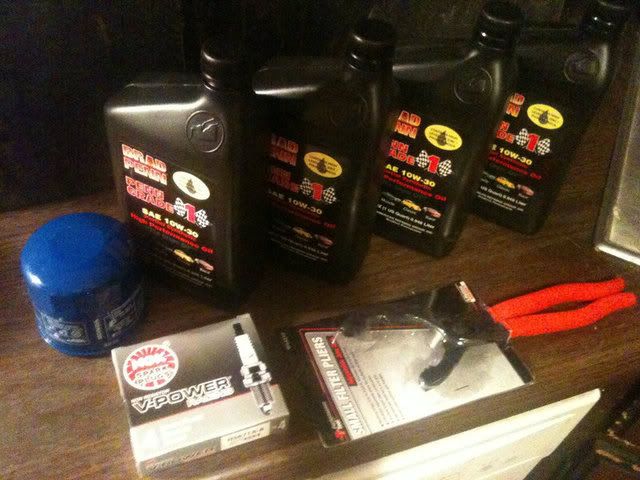
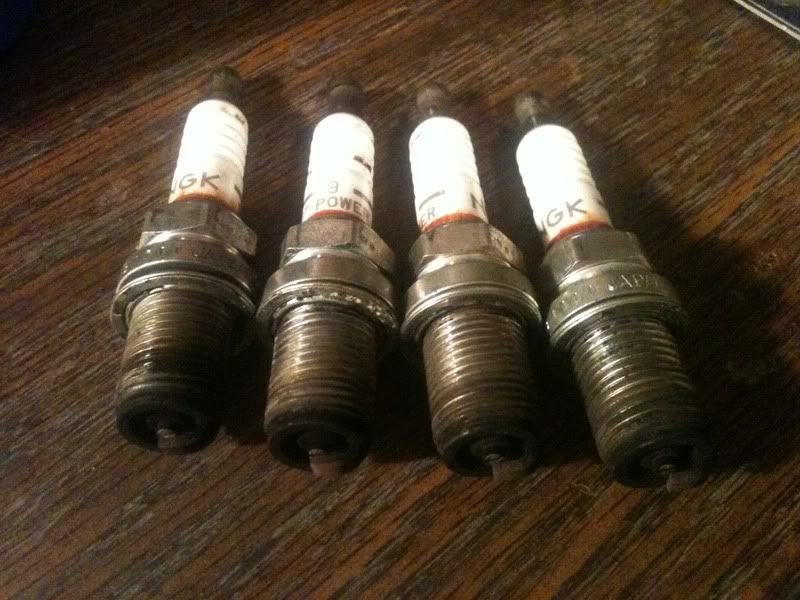
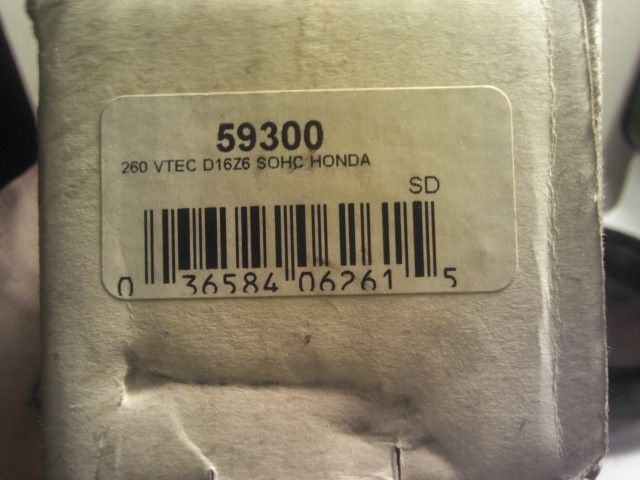
I installed the oil pan, new plugs gapped at .035", and my header. This time I tightened the brace a little more so it can't move.

My lawn mower battery just didn't have the CCA that it used to. I had to get another battery. I wanted to do a compression test but that damn battery just couldn't do it. I didn't want to walk 10 miles to the next Walmart to get another battery. So I jump started my Civic and drove down to Walmart.

I am glad to report that my engine ran like a dream to Walmart and back. I recently put in a few gallons of VP 110 race fuel*. Combined with new plugs my motor really felt nice. I'm sure thirty two degree ambient temps helped out as well.

There at Walmart, I picked up another lawn mower battery that has 275 CCA compared to my old batteries 230 CCA. Once installed the new battery had no problem getting my engine started. I installed the battery at Walmart. I'm glad to report that I have no oil leaks and my dip stick did not pop out. Everything motor wise is checking out nicely so far.

I plan to do a compression test during my lunch break at work tomorrow. More updates soon. Thanks for reading!

*Some of you may remember that I spoke of switching to E85 fuel. Last June E85 had a significant blend change. In my area E85 is more like E70 and carries only a 95ish octane rating. VP 110 has an octane rating of 107 and was formulated for engines that have 12 - 14.0 compression ratios. I decided to stick with VP fuel at this time.

Tuesday, November 20, 2012

Still Truckin' =)

Hello world! It's been too long since I have updated this blog. My project is still alive and kicking, well sort of.

It's that time for me to do a tune up in my high compression mini me. When I first built this motor I started off with off the shelf Valvoline 5w-30 oil. After 500 miles I changed the oil to off the shelf Royal Purple 5w-30. I felt that the RP worked rather well. I hardly burned any oil at all and my head has well over 150,000 miles on it.

I'm the type of person that likes to test a variety of products, including oils. Next oil change I decided to give Castrol Syntec Edge with Titanium synthetic a shot. I feel that this oil did not perform as well as the RP. The RP stayed cleaner longer and did not burn off like the Castrol oil did. In 3000 miles my motor ate about a 1/16th of a quart of oil compared to the Castrol's 1/4 of a quart of oil consumption in the same amount of miles.

This time around I'm giving Brad Penn a try. I bought 10w-30, an oem S2000 oil filter and some new NGK spark plugs.
NewOilandOEMoilfilter.jpg New Oil and OEM oil filter
Recently my little lawn mower battery took a crap on me and it oozed out a bunch of battery juice. It hasn't been able to keep a charge for more than a day. I tried to start it up and it cranked a few times before the voltage plummeted. It was to the point where the main relay was clicking like crazy and my volts gauge showed less than 8 volts. I thought no big deal, I've had this battery for two years and have been charging it with more amps than it was meant to handle. Since I wasn't able to get it to start, I pushed my car into my work area.
I was working on my car yesterday making the card board template for my battery tray and catch can. I noticed that my dip stick was sticking out a bit as if I hadn't pushed it down enough. I look under my car and there was a small puddle oil under right under the oil pan drain. A good size, at least six inches in diameter. Keep in mind I rolled my car into where it is now and it only sat for a day. I did not try to start it while it's been in the back. But my engine developed enough crank case pressure just sitting there to push out the dipstick and to push oil out of the drain bung. My engine is rather clean and I could not find anywhere else where oil could have leaked from.

The last time I drove my car was when I did a first through four gear pull. I did check my motor after that pull and there was no leaks, no excessive crank case pressure, no smoke out of the exhaust or crank case breathers, and the ECT was only 186* during and after the pull. My catch can has a little oil in it and it the line going to the back of the block. 

I drained all of my oil out. It was a bit dirty but there was no shavings, coolant or debris in the oil. Once I get another battery I'm going to do a compression test. My spark plugs look great, no detonation, no pitting, no debris. 

I realize that either the head gasket, pistons or rings will cause this kind of crankcase pressure. So far I have nothing to lead me to that being the case. My engine never misfires and wasn't running bad at all. I've read many "p29 broken ring land" threads in the last few days. My engine didn't have any of the problems that other D series forums have had. In fact I have ran only one set of plugs, a set of R5671A-9. I pulled the plugs today. A little rich but other wise not bad at all for having 6500 miles on them. 
IMG_03431.jpg  
I should have mentioned that this has happened once in the past where the oil breather box puked out some oil. It was a similar situation with low battery voltages and me cranking on it. Funny, the lawn mower battery has enough CCA to crank the engine over but it doesn't have enough umph to power the ignition system and fuel pump. The engine will crank and crank but won't start. In those situations is when my motor pukes oil. 
I would have thought that all of the excess crank case pressure would have gone into my catch can. But there was only a little oil inside and a small amount residing in the tube (I used a clear braided hose). I can see light through my catch can's filter so I don't think the filter is clogged. My valve cover vent is open, not connected to anything. There isn't any oil all over my throttle body or intake manifold. Plus my motor only leaked this oil after I pushed it 30 feet from where it was. I checked the spot where I had my car last running and there is no oil deposit on the ground.   

Tomorrow I am going to buy a new battery so I can do a compression test. Hopefully the compression test will come out the way I want it to. Updates soon.

Wednesday, October 3, 2012

I love big cams!

Howdy!

I finished installing my new Zex cam a few days ago. My y8 AEM cam gear had to be adjusted -5* degrees to line up with a z6 AEM cam gear. Why didn't I use the z6 gear you ask? Because the y8 gear has 6 bolts while the z6 gear is the old style and has 3. I don't want the gear to slip.

I adjusted the valve lash on the loose side (.009/.011") just to see how much it would clack. Surprisingly the clack isn't that bad, or as bad as I expected. I had once ran a Delta 272 cam in an all motor d15b2 that I had a long time ago. That cam clacked terribly bad no matter how tight the valve lash was.

The first thing I noticed with the cam is how much louder and deeper the exhaust tone is. With the stock cam I could drive comfortably around with an open header. Now that is not the case. I supposed that extra lift and duration on the exhaust side increased the decibles of my engine's exhaust note. The cam has a little lope to it; a smidge more than a stock y8 stock cam.

Performance wise I saw and felt a difference right away. My AFRs went from 14.2 at an idle to 16.4! My motor likes fuel and ran the smoothest between 13.2 - 14.0 in part and half throttle conditions. With the 59300 cam and in non vtec operation, my engine leaned out to 15 - 15.5 in those areas.

I am going to tune the low rpm maps before I even activate vtec. I went to do some preliminary tuning on Monday but ran into a problem with my Ostrich. Any change I made to the ROM then uploaded to the Ostrich would either make the ECU throw a solid cel or would kill the motor. I hope to have that resolved and I will attempt to tune today.

Once I finish tuning it, it's time for some ripper videos.

After that I plan to tear the car down for the winter. I'm going to strip it to a bare shell to remove all sound deadening material (mainly under the car) and repair all rust. No more of this not making it to the track because I can't pass tech. I am sick of that excuse!

Thanks for reading (if anyone out there still reads this lol)!

Saturday, September 29, 2012

Finally An Update =)

Today I picked this up for free...

Photobucket

It's a brand new Zex 59300 camshaft. It's never been ran before.

I'm excited and anxious to run this cam. Some have had awesome results while others have had not so awesome results. With the compression my engine makes and my header, I can't wait to test this cam and to hopefully make some more power.


Thursday, July 26, 2012

Nothing New to Report

Hello fellow Honda lovers!

It's been too long since I have updated my dear old blog. I wish that I had some fantastic news to report but I don't. My high compression y7/y8 engine is running great at least. My Bisi Beaver header is doing just fine and hasn't cracked. I've put about 1000 street miles on my old '88 this summer. I haven't burned any oil nor coolant. I'm glad at least that my engine has been acting like a Honda and is extremely reliable.

My windshield cracked a lot more as there was some major hail storms in my area. Now there is no way in hell tech would pass me at either 1/4 mile track. Hell if I were the tech guy I wouldn't pass my car due to the three long cracks spreading across the windshield.

I haven't been able to get much work done to my Civic since my Jeep is falling apart. 240,000 miles and its nickle and diming me left and right. First the water pump, now the U joints, the muffler came apart inside, the catalytic converter is rattling, and I need a new CPS sensor. Ughhhh. Just when I thought I was going to make it to the track, something had to come up.

So my dreams of going to the track this year are at a halt at the moment. I am disappointed in myself that I wasn't able to get my goals accomplished at this point in time. Shit happens and it happened a lot so far this summer. I can't and won't let all of my goals go down the toilet. If I cannot make it to the track, I am definitely going to do three pulls at my local dyno for $50 bucks.

Once I get that done, I will post the dyno charts. I am looking forward to at least seeing what my power curve looks like.

Monday, June 18, 2012

Summer Time Blues

A few weeks ago I rented a tow dolly and set my sights on getting to Bandimere to participate in their Wednesday Night test and tune session. Everything was set to go. Bandimere's tech department gave me the go ahead and said they would pass me for tech just this once with a cracked windshield. The weather was beautiful and I managed to get off of work early that day just to ensure I made it there and had time to not be rushed.

Bandimere is about 65 miles away from my house. There are two different highways to take. One has a lower speed limit than the other. I opted to take the lower speed limit route in case I ran into lack of power going up hills when towing. My family and I loaded into the Jeep and took off.

40 miles into the trip my water pump starting squealing terribly. I pulled over. My father and I inspected the engine. The squeal was coming from inside of the water pump's case. The bearing that the propeller rides on broke down and no longer wanted to turn. I thought long and hard on the side of the road what to do. I pondered whether I should try and make it to the track, make some runs then worry about getting home. Then again I did not want to get stranded in a town 65 miles from home. So I turned around and went home.

Luckily my Jeep made it home. Right when I pulled up, my water pumps internal bearing seized and cracked the water pump case. Coolant was shooting out of the cracks in a sprinkler type pattern.

This left me in a bind. Now my daily driver is down and I did not have the extra cash nor the time to fix it. Being that my Civic is insured and licensed, I had to start driving it daily. Open header and all.

It's been a loud ride so far. I've been trying to stay positive about this. Soon my Jeep will be back up and running. Then I will try again to make it to the track.

The only good thing about this situation is I have had the chance to really fine tune my motor with the Bisi Beaver header. My fuel map and timing map are so much different compared to my Pacesetter ROM and original Bisimoto ROM. This is a good thing folks as my car feels more powerful than ever before.

Monday, May 28, 2012

Memorial Day Fun

Today I decided that I needed to capture a decent video of my car running on the streets. My last few videos have been super shaky and criticized. I don't blame the critics, the videos aren't the best. I cannot afford a Go Pro or similar camera at the moment. I figured out that the next best thing would be a tripod mounted in the car to keep the camera still. My Dad had a tripod my sister was tossing out. I acquired the tripod and duct taped it to the floor of my chassis. I took my '88 for a spin and here is the result. I hope you all enjoy! I sure did!


Friday, May 25, 2012

Progress!

I made some progress today. I acquired a breather filter and JB Welded it to the catch can cap...

Breather Cap, Just as the title says

After three weeks of waiting, my last fitting from Jeg's showed up. This one little guy took that long to get to me.

Jeg's Fitting, Made from scratch just for me lol

Now that the fitting is in my possession, I finally had a chance to install my catch can.

B&R Block Fitting, Block fitting, reducer and Derale barb fitting

Rockstar Catch Can, Here is the can temporarily fastened down.

I realize that it sits a bit crooked. I don't mind it sitting like that. I will find out if that track will care for some reason just to make sure it'll pass tech.

I also made up a new headlight cover to go behind the velocity stack. This time I fashioned it out of plastic. It came out nice covered in duct tape.

'88 Civic, Shot 5/25/2012

Headlight Intake, New headlight cover made from plastic


Friday, May 18, 2012

Behind....Again

As you all have noticed there has been a lack of updates within my blog here. I missed my goal (again) of hitting the track on May 11 and for hitting the track this evening. Life is "challenging" at the moment. That doesn't mean I haven't been putting work in!

When I did the pull in the video, my engine puked out a little oil. Oil came out of the top hole within that black breather box on the back of my block. That hasn't happened before. I decided that I need to get serious with my crankcase evac and made a catch can.

I kept my catch can simple. The valve cover port goes to the side of the catch can and the block port goes to the bottom of the catch can. That way if my motor pushes oil out of the back of the block again it will go up the long line and into the catch can.

I don't want to be responsible for a mess at the track plus I want to monitor how much oil get pushed out per run down the quarter mile.

The first thing I did was purchase a 12 AN bock fitting from B&R Fittings. I have to give it up to these guys! My order was here in 3 days and the email communication was phenomenal. I also bought an 12 AN to 10 AN adapter from B&R. Here it is hiding out...

B&R Block Fitting, Hiding out!

My catch can is a little different than most. I didn't want to spend $100 on a aluminum catch can. So I made my own out of this...

Catch Can

Here are my supplies....

Catch Can

I drilled a hole in the side of the Rockstar can for the block port fitting. I found the barb fitting at Lowe's.

Catch Can

Here's the side fitting JB Welded in...

Catch Can

I drilled a hole in the bottom of the can...

Catch Can

Here's an inside view...

Catch Can

And it JB Welded in...

Catch Can

Catch Can

Here's the end result with the fittings and JB Weld painted...

Catch Can Done

I'm waiting on one more fitting to shop from Jeg's. I also need to get an air filter for the lid.


That wasn't the only work I did. I told myself I would put any more work and money into MY custom header. Three people have worked on this header, Bisi, Matt and a local tig welding veteran Al. The header was perfect in every way except one- it was a little off on it's angle through the exhaust tunnel. Here's a pic of how it looked...

Underside

Underside

Matt instructed me where to cut it. I did so and marked the pipe where it would clear the exhaust tunnel. I took the header back to my friend, Al at Front Range Precision welding. This guy has been professionally tig welding for 35 years. Not only did he weld the header back together, he also found another damn crack on it. Thankfully he filled it in for me.

Since the megaphone is mild steel it began to rust quickly even though there isn't an ocean around for thousands of miles. I picked up a can of BBQ grill paint to coat the header. It's good up to 1200* degrees and only cost $5 at Ace Hardware.

Anyway, time for pictures!

My Custom Header, Looking much better with a slight adjustment

My Custom Header

You can see where I bashed in the unibody to make room for the megaphone. Now it has great clearance. I am so happy.

My Custom Header, BBQ Black

My Custom Header

My Custom Header, Looks can be deceiving! The o2 sensor has plenty of room

Looks can be deceiving...

My Custom Header, Tight clearance under the axle but the suspension is as low as it can in this pic.

In the picture above the axle is hanging down as low as the suspension will allow it. There is still a 1/4" of clearance.

My Custom Header

My Custom Header

My Custom Header

My Custom Header

5-18-2012 Engine Bay

My Custom Header

5-18-2012 Engine Bay


Thursday, April 26, 2012

Long Awaited Updates

I have been away for awhile. I ran into a wiring issue that turned out to be a burned out emulation cable. That delay put me behind a few weeks and I missed my initial goal of April 14th at Bandimere.

The track that is closer to me is PMP in Pueblo, Colorado. I have ran here primarily. Their opening day is May 11th. I have a new emulation cable and a new SST chip in case this cable goes bad. This time I can make my goals a reality and hit the track to have some fun.

I took the car out today for a little spin. I took a shaky video.


Thursday, March 29, 2012

Finally Some Videos

My wife Kristy and I made a few videos. Before anyone gets bent out of shape about the name of the videos, I feel that it is appropriate. Technically the header is 50% made by Bisimoto and 50% made by the Acid Beaver. Thus "Bisi Beaver". It seems people think Mr. Ezerioha might get upset over the name. I certainly hope that he does not. Anyway here are the videos. Enjoy!


This weekend I will be pulling the header off to remove the sway bar and to massage a little more clearance for the header. I don't want it to crack and when idling at 800 rpm I can hear the header clanking against the sway bar. I will do anything to prevent any more cracks appearing in my header.

Here's my to do list:

-remove header, remove sway bar, pound body, install header and header brace
-fab sheet metal head light cover
-remove windshield
-fix rust
-install windshield
-clean and paint interior classic grey

I'm slowly but surely getting there. I hope to get the list knocked out. April 14th is Bandimere's opening day.  My deadline is approaching fast!

Sunday, March 25, 2012

Another Sunday Update

It was beautiful weather today in Colorado Springs, Colorado. Temps were at a nice 73* degrees F and only 5% humidity. I took this opportunity to get work done to the '88.

I went to Harbor Freight and bought a 4.5" angle grinder for $15 bucks. I bought some thin metal cutting blades for $5 dollars. I used these tools to chop up my hood and front radiator support. I did this so my radiator can fit nice and straight.

Looking Sexy

Double Yeaaaaaah

Getting There

Hood Gutted

Here are a few more shots of the underside and megaphone reverse cone...

Underside

Underside

I knocked a ton of tasks off of my to do list. Here's what I have left:

-get my Ostrich back from a customer's car so I can install into my car
-create start up video
-gut doors
-fab window mount
-fab battery tie down
-remove windshield
-fix rust
-install new windshield
-test

I know a lot of people are anxious to see a start up video. As soon  as I get emulator back it's time to fire my engine up. I won't be meeting up with the customer as I had hoped this evening. Tomorrow will be the day!

Friday, March 23, 2012

Big Updates Today!

I received my Bisi Beaver header today from Matt aka the Acid Beaver. I installed the header as soon as made it home from work. It looks so nice!

Bisi Beaver Header Installed

Bisi Beaver Header Installed

Bisi Beaver Header Installed

Bisi Beaver Header Installed

Bisi Beaver Header Installed

Bisi Beaver Header Installed

Bisi Beaver Header Installed

Bisi Beaver Header Installed

Bisi Beaver Header Installed

Bisi Beaver Header Installed

Bisi Beaver Header Installed

Bisi Beaver Header Installed

Bisi Beaver Header Installed

Bisi Beaver Header Installed

Bisi Beaver Header Installed

I ran into one slight issue that is being solved with the last tool I like to use, a hammer. The '88 chassis is a bit funky and the exhaust tunnel has an odd shape. Because of this, the reverse cone is pushing against the exhaust tunnel...

Bisi Beaver Header Installed

In this picture the header is loose and you can see where I need to widen the tunnel a little more...

Bisi Beaver Header Installed

More beating will commence tomorrow!

Overall I love this header! Beave's mods and welds look great. I could not be happier. The Bisi downpipe always made the header feel weak and I could visibly move the downpipe with the flange tight. With Matt's downpipe, there is no movement whatsoever. Now my header much more solid and I can use an oem back of the block exhaust hanger to brace it to the back of the block. I'M STOKED!!!

Tomorrow I will fire the engine up. I still need to install radiator brackets before I can start the engine but that won't take long. In the meantime, here are some pictures to enjoy...

Almost There

Bisi Beaver Header Installed

Almost There

Almost There

Almost There

Almost There

Almost There

Almost There